Rancher Desktop can be used as a replacement for Docker Desktop, since it is a free and open-source graphical application that provides Docker and Kubernetes for any desktop/laptop with MacOS (both on Intel and Apple Silicon), Windows, and Linux. Let's find out the best way to install it.
Before installing Rancher Desktop, if you already use Docker Desktop, you will need to stop it, and maybe later even uninstall it.
On Linux or macOS, if you have kind and / or docker installed it would be a good idea to clean up everything before installing Rancher Desktop. If you cannot afford this, you will need to at least stop the docker engine, probably with a command like sudo systemctl stop docker, eventually prevent it to start on boot with sudo systemctl disable docker.
To clean up a kind + docker Linux setup, try something along those lines:
kind delete cluster
sudo docker ps # list all running containers
sudo docker rm -f <ID1> <ID2>... etc  # stop and delete containers with <ID>
sudo docker system prune --volumes
dpkg -l | grep docker   # list all installed packaged show only docker
sudo apt purge docker-ce ... # uninstall all docker packages
You can follow the steps from https://docs.rancherdesktop.io/getting-started/installation
For Ubuntu Linux, you will need to sudo apt install pass and to generate a gpg key as explained in there. Then continue with "Installation via .deb Package".
Then start Rancher Desktop, search for it in your graphical menu system.
On the first start, you will be presented with some choices. Most of the defaults are ok, except at "Container runtime" where we recommend selecting the option "dockerd (moby)" instead of "containerd". This way you will be able to use familliar Docker commands.

Wait until the progress bar in the left-down side is completed. Then start a NEW shell and try:
docker ps
kubectl get nodes
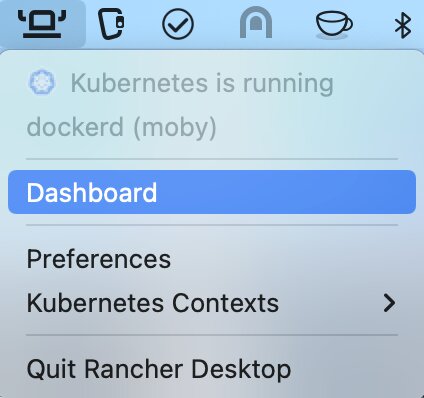
If those work, you're all set. You may close the main window of Rancher Desktop and, when needed, access it from the small icon in the taskbar:
If the above commands fails, you may have a PATH problem. The Rancher Desktop will add something like this into your ~/.bashrc file:
### MANAGED BY RANCHER DESKTOP START (DO NOT EDIT)
export PATH="/Users/vang/.rd/bin:$PATH"
### MANAGED BY RANCHER DESKTOP END (DO NOT EDIT)
because it installs all its binaries in that .rd/bin directory. But on newer Macs, zsh is the default shell instead of bash so you will need to copy those lines from ~/.bashrc into a file called ~/.zshrc.
If you just want to build an image and use it in your local Kubernetes, you don't need an image repository. For example, i'm building this image and immediately starting a pod from it:
docker build -t dummy:0.7 .
docker images
kubectl delete pod dummy              # delete dummy pod if exists
kubectl run dummy --image=dummy:0.7   # start a new dummy pod from this image
kubectl get pods
As shown above, you can docker build images and run them on your laptop. But if you try to push them to Docker Hub you will notice, on Docker Hub webinterface, that the image is built for the arm64 architecture. You will frequently have Kubernetes clusters with amd64 / x86 architecture so you need the Docker image to be on that arch. Fortunately, there is a way to build images multi-architecture. Read more on https://blog.jaimyn.dev/how-to-build-multi-architecture-docker-images-on-an-m1-mac/
This is an example on how I do it for my dummy image:
docker buildx create --use
docker buildx build --platform linux/amd64,linux/arm64 -t vvang/dummy:0.8 .
docker push vvang/dummy:0.8
#docker ps | grep buildx # remove that container if you wish
If you look now at the Docker Hub webinterface you will see the new image is multi-arch:

Docker and Kubernetes will auto-select the right architecture when pulling the image.
When you are compiling GO programs, by default the compiler will target your processor and OS. For example, go build main.go will produce a binary which you can run on your M1 Macbook.
If you try to run this on another architecture, you will get an exec format error.
For the GO language, you will need to compile with something like GOOS=linux GOARCH=amd64 go build main.go. Those two environment variables will tell the GO compiler which is the target architecture and operating system.
Rancher Desktop uses Traefik as the default ingress controller in this local Kubernetes. On our prod/dev clusters we use Nginx.
If you want to be as close as production to that, you may switch to Nginx by using this info https://docs.rancherdesktop.io/how-to-guides/setup-NGINX-Ingress-Controller . In step 1, you will need to exit and restart Rancher Desktop.
And that's it. You can now freely use Rancher Desktop. Find full documentation about Rancher Desktop here, and this article can be found on github too.

Viorel Anghel has 20+ years of experience as an IT Professional, taking on various roles, such as Systems Architect, Sysadmin, Network Engineer, SRE, DevOps, and Tech Lead. He has a background in Unix/Linux systems administration, high availability, scalability, change, and config management. Also, Viorel is a RedHat Certified Engineer and AWS Certified Solutions Architect, working with Docker, Kubernetes, Xen, AWS, GCP, Cassandra, Kafka, and many other technologies. He is the Head of Cloud and Infrastructure at eSolutions.